Monday, November 30, 2015

Breaking up water softener salt pellets

I'm all about saving money whenever possible.

We're a very small scale operation here at The Wits' End.  We make all of our screens and presses by hand.  I screen the items that people order on the island by the kitchen sink.  I hope to eventually move everything out to the garage, but the plumbing is not there and getting it installed is very expensive. Being on a fixed income, I have to conserve money as much as possible (the sales are not yet really happening for the store).  One of the ways that I do that is to use fifty pound bags of water softener salt pellets for use when I need to hand dye items.  Dyeing requires a lot of salt.  I can get a fifty pound bag for something in the range of $4.00 US.

Those things are hard!

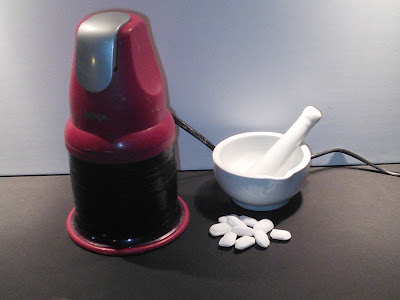
The problem with using the pellets is that they are incredibly hard.  I've tried hammering them, I've tried using a mortar and pestle, I've tried putting them in a burlap bag and slamming them against concrete.  None of those worked.  I've gone through a number of blenders.  They work, but they don't last very long. I get the blenders cheaply when they are on sale, or through thrift stores, but it irks me to be continually spending money on something when I'm trying to save money.

A Ninja to the rescue.

After the last blender died, I decided to look at other options.  I have a Ninja Express Chop that I picked up for less than $20.00 a year or so ago and don't use for food any more.  Knowing how hard the pellets are, I knew that the plastic wouldn't hold up to being knocked around by the blades for very long. I took some Duck tape and put a couple of layers around it. That way, it keeps the plastic from shattering, and if it does develop a crack it won't leak. That's important, since I now make a slurry by adding water, instead of just grinding the pellets up while they're dry.  It's not quite as convenient since I can't really do any up in advance, but it doesn't take long to do two or three cups of salt as needed, so it's not that bad.  I've been doing this for a while now, and the Ninja isn't showing any signs of dying.


Thursday, November 26, 2015

30% off sale extended through December 4th.

Good News

Coupon code NOV30 is now valid until midnight, December 5th, 2015

Coupon code NOV30 gave everyone 30% off on their entire order at both the online store and the Etsy shop.  However,  it ended at midnight, December 1st. It occurred to me that many people don't get paid until the first of the month or the Friday following that, and that they might want to get in on these deals in time for gift giving.  Therefore, I've extended the expiration date of the coupon code until midnight on the 5th of December. The coupon can be used as many times as you like up until the expiration; so if you realize that you forgot something, you can stop back in and use it again for another 30% off deal.

Check out what we have available at


Some screens I'll be using today.

Not Exactly High Tech

I'm going to be making a post soon about how I make my screens from artist's stretcher bars.  Here are some of the items that I use in the process.
What you see there is:
  1. A rubber mallet. For showing those stretcher bars who is the boss.
  2. Wood glue.
  3. A canvas stretcher.  Fun to use use the stretcher in one hand and the stapler in the other.
  4. A staple gun and light duty staples.
  5. A heavy duty staple remover. Mistakes happen, and frames get re-tightened or reused.
  6. A thread counter (used to check alignment and the thread count of the screen fabric).

I don't need no steenkin' press!

Actually, I do - but I can't afford it at the moment.  Instead, I use something that I did up myself.
I also have a Yudu machine that I've had from the very beginning.  I use it sometimes, but rarely with the screens that come with it.  Mostly as an elevated platform to pull the prints using screens that I've made, as a light table for drawing, or as an exposure unit. Those little hooks on the sides are used to stretch some large rubber bands across the shirt/platen combo to hold it in place - I just wrap the rubber band around the whole thing on the bottom.

A couple of screens I'm getting ready to use today.

It's an Atheist theme, apparently


These aren't masked off yet.  You'll notice that the alignment with the frame isn't totally perfect on the Invisible Pink Unicorn one.  That's not really significant since the shirt and the homemade platen that I use aren't fixed.  I can adjust them as necessary.

Not super fancy looking, but they get the job done.


Be an Atheist Superhero!

There is a new tee available in the online store, and it's 15% off for a limited time.
Atheist Superhero tee at The WIt's End
This is the Atheist symbol, done up in the style somewhat similar to a famous DC Comics super hero.  Note that the shirt color is going to be a deeper shade of blue, since locally, Royal and Navy are the only dark blues available.
This is a close-up of the design.


Tuesday, November 24, 2015

This blog post is for the filthy rich only.

Hand screened Atheist symbol mouse pad.

We offer great bulk rates at The Wits's End.  For example; did you know that if you are silly rich, you could buy 40 of these hand screened mouse pads for under $200?  That's an awesome deal, right?  I know.
Once you have them, you can use them to:
  • Level that wobbly dining room table in time for the holiday feast.
  • Ease your staff's attempts to open recalcitrant jars in the kitchen.
  • Keep your Tibetan Mastiff's water bowl from sliding.
  • Patch the hole in the west wing guest room bathroom arising from the unfortunate attempt to launch your own party network satellite.
  • Use it as a template to draw an Atheist symbol in the GIMP.
  • Wallpaper the Lotus Exige garage room.

The possibilities are endless! Why not buy 8,000 now and line your driveway!