Monday, November 30, 2015

Breaking up water softener salt pellets

I'm all about saving money whenever possible.

We're a very small scale operation here at The Wits' End.  We make all of our screens and presses by hand.  I screen the items that people order on the island by the kitchen sink.  I hope to eventually move everything out to the garage, but the plumbing is not there and getting it installed is very expensive. Being on a fixed income, I have to conserve money as much as possible (the sales are not yet really happening for the store).  One of the ways that I do that is to use fifty pound bags of water softener salt pellets for use when I need to hand dye items.  Dyeing requires a lot of salt.  I can get a fifty pound bag for something in the range of $4.00 US.

Those things are hard!

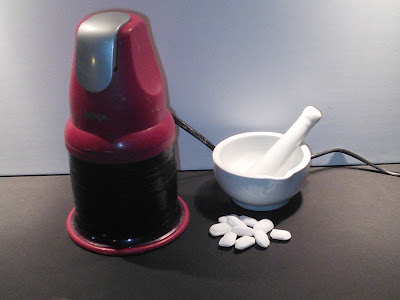
The problem with using the pellets is that they are incredibly hard.  I've tried hammering them, I've tried using a mortar and pestle, I've tried putting them in a burlap bag and slamming them against concrete.  None of those worked.  I've gone through a number of blenders.  They work, but they don't last very long. I get the blenders cheaply when they are on sale, or through thrift stores, but it irks me to be continually spending money on something when I'm trying to save money.

A Ninja to the rescue.

After the last blender died, I decided to look at other options.  I have a Ninja Express Chop that I picked up for less than $20.00 a year or so ago and don't use for food any more.  Knowing how hard the pellets are, I knew that the plastic wouldn't hold up to being knocked around by the blades for very long. I took some Duck tape and put a couple of layers around it. That way, it keeps the plastic from shattering, and if it does develop a crack it won't leak. That's important, since I now make a slurry by adding water, instead of just grinding the pellets up while they're dry.  It's not quite as convenient since I can't really do any up in advance, but it doesn't take long to do two or three cups of salt as needed, so it's not that bad.  I've been doing this for a while now, and the Ninja isn't showing any signs of dying.


Thursday, November 26, 2015

30% off sale extended through December 4th.

Good News

Coupon code NOV30 is now valid until midnight, December 5th, 2015

Coupon code NOV30 gave everyone 30% off on their entire order at both the online store and the Etsy shop.  However,  it ended at midnight, December 1st. It occurred to me that many people don't get paid until the first of the month or the Friday following that, and that they might want to get in on these deals in time for gift giving.  Therefore, I've extended the expiration date of the coupon code until midnight on the 5th of December. The coupon can be used as many times as you like up until the expiration; so if you realize that you forgot something, you can stop back in and use it again for another 30% off deal.

Check out what we have available at


Some screens I'll be using today.

Not Exactly High Tech

I'm going to be making a post soon about how I make my screens from artist's stretcher bars.  Here are some of the items that I use in the process.
What you see there is:
  1. A rubber mallet. For showing those stretcher bars who is the boss.
  2. Wood glue.
  3. A canvas stretcher.  Fun to use use the stretcher in one hand and the stapler in the other.
  4. A staple gun and light duty staples.
  5. A heavy duty staple remover. Mistakes happen, and frames get re-tightened or reused.
  6. A thread counter (used to check alignment and the thread count of the screen fabric).

I don't need no steenkin' press!

Actually, I do - but I can't afford it at the moment.  Instead, I use something that I did up myself.
I also have a Yudu machine that I've had from the very beginning.  I use it sometimes, but rarely with the screens that come with it.  Mostly as an elevated platform to pull the prints using screens that I've made, as a light table for drawing, or as an exposure unit. Those little hooks on the sides are used to stretch some large rubber bands across the shirt/platen combo to hold it in place - I just wrap the rubber band around the whole thing on the bottom.

A couple of screens I'm getting ready to use today.

It's an Atheist theme, apparently


These aren't masked off yet.  You'll notice that the alignment with the frame isn't totally perfect on the Invisible Pink Unicorn one.  That's not really significant since the shirt and the homemade platen that I use aren't fixed.  I can adjust them as necessary.

Not super fancy looking, but they get the job done.


Be an Atheist Superhero!

There is a new tee available in the online store, and it's 15% off for a limited time.
Atheist Superhero tee at The WIt's End
This is the Atheist symbol, done up in the style somewhat similar to a famous DC Comics super hero.  Note that the shirt color is going to be a deeper shade of blue, since locally, Royal and Navy are the only dark blues available.
This is a close-up of the design.


Tuesday, November 24, 2015

This blog post is for the filthy rich only.

Hand screened Atheist symbol mouse pad.

We offer great bulk rates at The Wits's End.  For example; did you know that if you are silly rich, you could buy 40 of these hand screened mouse pads for under $200?  That's an awesome deal, right?  I know.
Once you have them, you can use them to:
  • Level that wobbly dining room table in time for the holiday feast.
  • Ease your staff's attempts to open recalcitrant jars in the kitchen.
  • Keep your Tibetan Mastiff's water bowl from sliding.
  • Patch the hole in the west wing guest room bathroom arising from the unfortunate attempt to launch your own party network satellite.
  • Use it as a template to draw an Atheist symbol in the GIMP.
  • Wallpaper the Lotus Exige garage room.

The possibilities are endless! Why not buy 8,000 now and line your driveway!

Wednesday, October 28, 2015

The 'Future' of my screens?

Using acrylic floor finish on my screens

OK, Ok, that title was a horrible pun.  However; I did want to talk about something I've been experimenting with for the last couple of days.  The usage of acrylic floor finish (similar to Future (which I suppose is now a Pledge floor finish that includes Future)) on my screens.

It goes on the frames

I make my own screens.  I generally do this with 'stretcher bars' which are made to stretch canvas.  I like them because I can get the bars in various sizes so I can make a variety of different sized screens.  One problem with them is that unless I do something to make them water resistant, they will warp as I wash the screens following the application of emulsion or ink.  I've tried various ways of making them water resistant.  Thompson's Water Seal spray, spray acrylic fixative, duck tape (or duct, if you prefer that), Mod Podge.  Nothing really struck me as exceptionally useful/easy/cost effective.

I have some off-brand acrylic floor finish that I use to protect and add gloss to some of my polymer clay items.  It occurred to me that it might work really well in making the stretcher bars water resistant.  Turns out that it's excellent.  Exceptionally easy to apply, and not very expensive.  So far, it seems to be working very well; however, I'm going to have to stress test some of the frames over the coming weeks to see how long it holds up.

It goes on the screens themselves

I've also been using it to fill in the borders of the screen printing fabric that do not have emulsion. That has to be done to keep the ink from getting through to the material.  I generally use tape on both sides of the screen, mostly the blue painters tape (which sticks surprisingly well, considering how easy it is to get off when I want it off), although sometimes I'll use clear packing tape. I have also tried Mod Podge, because it helps to be able to see though to the shirt/item beneath the screen to get the position right - something that's not possible with the painters tape. However, I've never really been too satisfied with the Mod Podge for this.  It's slow to apply, and it's more translucent than transparent.

So I've been using the acrylic floor finish for this too.  So far I'm mostly satisfied.  It's very clear, and it's doing a great job of keeping the ink from getting through.  On the downside, with the fabric store fabric that I use (haven't tried it on actual screen print fabric yet), I have to use at least two coats to fill everything in.  Being much easier to apply than the Mod Podge, this isn't really a big deal though.

Now it's just a matter of stress testing the fabric too.  I'll have to see how well it stands up to the repeated washings and scrubbing with soft-bristled nylon brushes when I'm cleaning the screen.


Monday, October 26, 2015

Lots of activity at The Wits' End

http://witsendstore.com

There is, and will be, a lot of activity taking place at the online store. I am currently in the process of ensuring that everything that is carried in the Etsy shop is also available from the online store. In addition, there are eighteen to twenty new items that will be going up soon.

I'm trying to shift more of the action away from the Etsy shop and to the online store. So far, that is not going very well. While sales at the Etsy shop are nothing to brag about, it still outperforms the online store by a very wide margin.

Once everything has been made to be available here (at the online store) I'm hoping to cull the list of items available on Etsy. I'm looking to make the Etsy shop blander, removing most of the more in-your-face items from it so that our neighbors feel more comfortable doing there. This is Corpus Christi, Texas, after all.

Visit us at: http://witsendstore.com

Saturday, September 19, 2015

To Scale: The Solar System


On a dry lakebed in Nevada, a group of friends build the first scale model of the solar system with complete planetary orbits: a true illustration of our place in the universe.

Wednesday, September 16, 2015

The Making of an LGBTQ Rainbow 'geek.' tee

Making an LGBTQ Rainbow 'geek.' tee

The plan

What I want to do is take a colored tee and put a screened 'geek.' on it, filled with the colors of the rainbow. I want to do this using a discharge process, so I don't have to put a base layer of white ink and compromise the feel (hand) of the tee. Discharge allows me to remove the colors that are already dyed in to the tee.

First, I need a screen

Why I have to make one

We're not a big operation, with 4-color or 6-color presses and flash driers. I literally do all of my screening on the island by the kitchen sink (hopefully, I'll be moving it out to the garage, once I work out some drainage). I register everything by hand, and air dry with the help of fans.  After I've pulled a screen, and it has dried, I heat set it with a household iron.

The fabric

I've decided to experiment with some chiffon that I bought at a hobby store recently. I was out of screen print fabric and it would take a while for any new fabric to arrive.  In addition, I'm all for saving money; if the chiffon works, then I'll be saving about twelve dollars per yard and shipping.  Of course, if it doesn't, then I'm out the money I spent for this, because I won't use it if it doesn't make high quality screens.

The frame

In this case, I decided to use an old metal frame that has been laying around for a while, rather than making a permanent one from stretcher bars like I normally do.  I grabbed some carpet tape and put it on both sides of the frame (very sticky affair).  I then hand stretched the chiffon as tightly as I could and pressed it firmly to the carpet tape on both sides. It will still eventually loosen this way, so if I wanted to make it permanent, I'd add a couple of dabs of super glue in various places (not on the tape, because that would just pull up the adhesive.  I'd then cover the fabric on the tape with aluminum vent tape.

Prepping the screen

Now I get to see if my photo emulsion will work on the chiffon.  I apply a nice even layer on both sides of the screen, and put it in a dark area with a fan - to allow it to dry for five or six hours (Corpus Christi is pretty humid, it takes a while sometimes). 

Checking it after it has dried, it seems to be adhering to the chiffon quite well.

I need a design of course

Sometimes, this is the most time consuming part of the process.  In this case, it's just a matter of firing up GIMP and printing out 'geek.' in a Courier 10pt Bold font at a size that will fit landscape on a piece of letter sized transparent vellum; that would be approximately 278pt in this case.

Burning the screen

This part went pretty well.  It turned out that my standard exposure was a little long.  I had to scrub quite a bit and use a high pressure (let's not banter semantics - it wasn't really 'high pressure', but the stream was narrowed considerably in one of those jet things) nozzle to try to get the unexposed emulsion out and have a nice clear design on the screen.

On to the shirt

A discharge tee

I actually did three shirts, just to test how well the chiffon would work. The first one I did was a discharge tee.  In a discharge tee, I'm basically bleaching the color out of a tee.  That gives the impression that it bleaches all of the color out, and leaves white; however, that is almost never the case. It's generally some shade of tan or red that remains.

To make one of these, I have to do a bleach paste up.  I have some Pyrex measuring cups (more like small tumblers). In this case, I decided that I wanted a really distinct discharge, so I did a 1/1 mix of bleach and water, and then I stirred in a small amount of sodium alginate.  Sodium alginate is extracted from brown seaweed and is used for many things, but for my purposes, as a thickener; which allows me to create a paste which I can screen and won't spread all over the place. 

After the mixture has tickened, I screen it on to the shirt, and let it sit for about fifteen minutes.  I then take the shirt and dunk it into a bucket with a mixture of vinegar and water, which counteracts the bleach.  I follow this up with a rinse and spin cycle in the washing machine.


After drying, the discharge tee looks like this (a quick smartphone shot, not color corrected):

A tee with opaque blue ink

This is the standard way that I screen shirts. Many times, I have to use a white base coat so that the colors will stand out.  However; my opaque blue covers pretty well.

This is what the shirt looks like with ink (again, a quick smartphone shot, not color corrected):

And finally, the rainbow tee

For the rainbow tee I have to take a few steps.
  1. Screen a discharge tee
  2. Wash and dry it
  3. Make a rainbow of colors and screen them over the area where I had discharged the ink.
For the colors, I have these convenient tubes made up, where I just squirt approximately equal amounts of color to cover the whole area with a rainbow, and then pull the colors with a single swipe of the squeegee.  Due to the nature of this process, each rainbow is unique.

I'm not going to show a photo of the finished shirt in this post at this time (I might add it later), but here's a photo of the screen and the inks that I used:
Check out what we available atThe Wits' End, visit http://witsendstore.com.

Sunday, September 13, 2015

Henceforth, I shall refer to you as Pi tee

There's a new tee up in the store

A little humor, a little math, and a lot of attitude

We all know these types.  You get involved in a discussion with them and they start spouting irrational nonsense.

That's bad enough, but once they start, you can't get them to stop.  They go on and on and on....

Tell them how you really feel

Using the symbol for Pi, this shirt will let them know what's on your mind; even if you don't want to vocalize the thoughts.  It states: "Henceforth, I shall refer to you as Pi, as you are irrational, and you go on and on forever."
This tee is hand screened on demand, and is available for $15.99 - bulk rates are available if you want to pick up more than one.

You can get it here

Monday, September 7, 2015

Looking for some feedback on The Wits' End

I'm looking to improve my shops. If you have ever visited either of them, or would care to visit now, I would really appreciate some feedback. Anything you provide at all will be useful. How I might improve designs, new designs I should offer, what you think of the pricing and discounts, color scheme - anything you want. Also, any thoughts you might have on how I can get the word out and start actually making some sales would be appreciated too.

There are two different stores, if you desire, you can comment on one or both.

 Thanks!

http://witsendstore.com
http://thewitsend.etsy.com

Tuesday, July 28, 2015

Science and Equality - IVF onesies for the baby with two moms

Mommy + Mommy + Test Tube = ME! onesie

Available in a variety of colors.

About this design

IVF for the win! For the baby with two mommies. Science is wonderful, and so is the new baby.

You can get these Carter's infant bodysuits at either of our two stores:

About the onesies

Screen printed on Carter's infant body suits. All body suits are printed on demand. You may request other ink colors. You may also request other body suit colors; however, they will be hand dyed and the hue may vary. Let me know what you would like in the Notes to Seller section or via a Convo and I will let you know if I can fulfill the request.

Note that in general, any special colors will have to be dyed by hand. I use Dharma Procion fiber reactive dye. Procion actually dyes the fiber, rather than laying a coat of color on the outside of it. This makes it color fast and safe, if your child decides that the clothes look yummy.

One point to note about it though is that it only dyes natural fibers; therefore, if there are (for example) polyester threads in the garment, they won't be dyed. This actually leads to quite a nice looking effect when it happens.

Another thing to note is that I might have to order the color that you desire, and that could add a few days to the time.

We'd love to have you visit

See these and lots of other great items at either of our two stores.

Monday, July 27, 2015

Coloring some Carter's infant bodysuits with Dharma Procion dye.


Some preliminary information

You may not be aware of it, but The Wits End is a small, family owned business. We operate out of our house and do not maintain any stock of tee and onesie blanks; for both financial and logistical reasons. Although, to be honest, that's not entirely accurate since I will sometimes buy a few common colors in a variety of sizes if the local craft stores are having a sale. In addition, the onesies are sold in groups of five. However; in general, if someone needs a particular color and size of shirt or infant bodysuit, I have to go in to town and buy it for the order.

I can buy any color I want, as long as it's white

Today I needed a black 9 month onesie for a Starstuff order:
I Am Made of Starstuff infant bodysuit, yellow on black.
You can't find bodysuits in a solid color here in Corpus Christi. There is one craft store that sells them in pink, blue, and black - but we don't get those because they shrink quite a lot and have a strange shape in general; plus, to be honest, we don't agree with their politics and don't shop there. Aside from all of that, we just prefer the quality of Carter's infant bodysuits, so that is all that we use.

I checked the storage area in the garage to see if I had any black 9 month onesies; I didn't, so that meant that I was going to have to dye one. I use Dharma Procion fiber reactive dyes. Procion dyes dye the fabric strands themselves, rather than just laying a coat of dye over the outside of the strand. This makes them very colorfast, and also safe, in the event that someone's child decides that their clothing looks particularly tasty on any individual day. One issue with the Procion dyes is that they only dye natural fibers. If the item has polyester threads, the threads will not dye. This isn't necessarily a bad thing, because it tends to give a nice look, like the onesie has a trim and many people like that.

Going to have to make my own

Dyeing properly is a very involved and time consuming process, therefore I never dye only one item. I'll usually select about a pound of tee shirts, onesies, and perhaps some personal items. Today I grabbed a pound of bodysuits, so that I would have some black ones ready for future orders.

Need some salt - lots of salt

The first step is to get some salt. Salt is necessary because both the fabric and the dye are negatively charged and repel each other. The salt alleviates this. Black dye, and in general any dye that contains red needs a lot of salt; about twice as much as other colors do. I needed six cups of salt for a pound of onesies. I use fifty pound bags of water softener pellets for salt. It isn't iodized, and it is simply salt, with no minerals or additives. You may have noticed that I said pellets. The salt needs to be dissolved in warm water, not an easy thing with rock hard pellets.  I keep a blender only used for crafts to chop the pellets up. Extremely noisy and hard on the blender (I've been through a couple now), but it works. For info, all of the items used in dyeing are only used for crafts.  I have them marked and kept separately. 

Getting the dye bath ready

The next step is to paste up some dye. Basically, just adding some water to four tablespoons of black dye powder and mashing it up to create a paste. Since this is black, and black is notoriously hard to do properly, I add a tablespoon of urea. This is also why I used four tablespoons of dye, because it is black - normally, I would only need one tablespoon for a pound of fabric. Urea helps dissolve the dye, and is also a humectant, which helps attract the dye to the water in the fabric. You might be saying: "Ewwww, urea? Isn't that from urine?" Well, yes, it is, but the urea used in this process isn't made from urine, but is instead synthesized from natural gas.  The pasted up dye goes in to the urea, which has been dissolved in about a cup of warm water and is thoroughly mixed together. This mixture is then put into the tote that I use for dyeing, and then I add about three gallons of warm water and the dissolved salt.

Let's turn those puppies black!

Now it is time to add the onesies. The onesies have been pre-washed in some detergent especially made for dyeing, to get all of the sizing and oils out. I wet them thoroughly before adding them to the tote one at a time. Wetting them first keeps them from getting uneven splotches. The onesies get stirred gently for about twenty minutes, and then I add dissolved soda ash in small amounts over a fifteen minute period. The soda ash is a dye fixative and makes the dye job permanent. Following the addition of the soda ash, I'll continue to stir the onesies for an additional hour, since black is a deep color and needs more time.

But let's not turn everything else black....

The onesies then get rinsed until the water runs clear, and I follow this up by washing them and giving them an extra long rinse cycle, followed by a trip through the drier.  The onesie is now ready to be screened and heat set.

Your purchases help provide feminine hygiene products to local shelters

Each purchase helps

We don't talk about it on the store sites, but a portion of each sale is set aside to help purchase feminine hygiene products for the local (Corpus Christi, TX) homeless and women's shelters.

Why would we do this?

Tampons and sanitary pads are pretty expensive, and people don't normally think of them when they're donating items to shelters. Not thinking about them doesn't stop the need of course. I'm a guy, so I have never experienced menstruation firsthand.  However; I still have an imagination.  Just the thought of being out on the street, desperate about so many other things and then having to deal with your period, has to be very stressful.

Of course, being a small company with just a small number sales per month, we can't do a lot - but every little bit helps.

Curious about our stores?

Visit us at:
http://thewitsend.aliboom.com
https://thewitsend.etsy.com

Using coupons at The Wits' End online store


Using coupons at the online store

Using a coupon at http://thewitsend.aliboom.com for the first time can be confusing.

What is the problem?

You find an item that you like and decide to purchase it, so you put it in the cart and enter your shiny new coupon code that is supposed to give you 20% off on your entire purchase. However; once you hit return, you find out that it didn't work.  What's up with that, are we lying to you?

Actually, no, we're not messing with you

We're not lying, promise.  The store is actually quite capable when it comes to coupons, when compared to our Etsy shop. The thing is though, you have to manually tell the system that you want to use the coupon (just the first time, it stays for your entire visit).

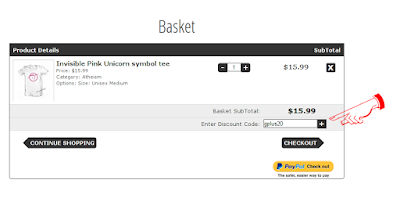
Here is the 'trick'

Selecting a coupon

Instead of using Return/Enter, you have to click on the "+" next to the coupon code that you've entered.
Selecting a coupon at http://thewitsend.aliboom.com

Deselecting a coupon

If you decide afterwards that you don't actually want to use a coupon, you remove it with the "x" to the right of it.
Removing a coupon at http://thewitsend.aliboom.com

Thanks!

Sunday, July 26, 2015

We offer bulk discounts

Bulk discounts are available

Are you a member of a group or organization?

The Wits End has bulk discounts available for almost all items in the store. Coupled with coupons, bulk orders can save you a significant amount of money.

The discounts are automatic; just enter the quantity desired and the discount will be calculated for you.

How does it work?

You just enter the quantity that you want, and the system will figure out the correct price.  The bottom of each description lists the bulk discount levels and prices for various items.

Say, for example, that you wanted to buy multiple Invisible Pink Unicorn mouse pads.

For one mouse pad

In the upper-left area, the price is shown as $8.99 (not really easy to see here, but it is - click on the image to enlarge it). It's the same price everywhere on the form in this case, because there is only one of them being purchased.

For twenty-five mouse pads

In the upper left corner, the price is now shown as $4.99 each, since you're getting the bulk discount. The two prices on the right hand side are the extension, showing what the total will be(25 x $4.99 = $124.75).  In this case they're the same; they would be different if you also applied a coupon.

For twenty-five mouse pads, and a coupon code

In this one, the price in the upper left is still $4.99 for the bulk discount, the price in the upper right is still $124.75 because you're ordering 25 of them.  However; you've now applied a coupon, so the actual amount is going to be reduced by 20% with this particular coupon. You're now down to $99.75; that makes the mouse pads effectively $3.99 apiece.

Shifting over from Pokey

Why the shift?

Currently, posts related to The Wits' End go to http://qnr-pokey.blogspot.com/. However, Pokey is really meant to be associated with photography, retro computers and happenings in the Coastal Bend area of south Texas.

In addition, since we are actually paying for an online storefront, we should have a blog that is dedicated to that storefront and that makes things easy to find. This should be up and running properly by the end of this week.